
Okay, confession time:
This little kid’s table sat in my garage for six months before I finally gave it the attention it deserved. Every time I walked past it, I just… wasn’t inspired. You know how some pieces instantly spark a vision? Yeah, this was not one of those.
Let me paint you a (very figurative) picture of what it looked like before:
A dull, dirty white finish with a faded Peter Rabbit decal right in the center. Honestly, it was not cute. I didn’t even take a before photo—partly because I forgot, partly because I didn’t think it was worth documenting.
But hey, we all know that judging a piece by its current state is a rookie mistake. So I finally decided it was time to stop avoiding it and bring this table back to life.
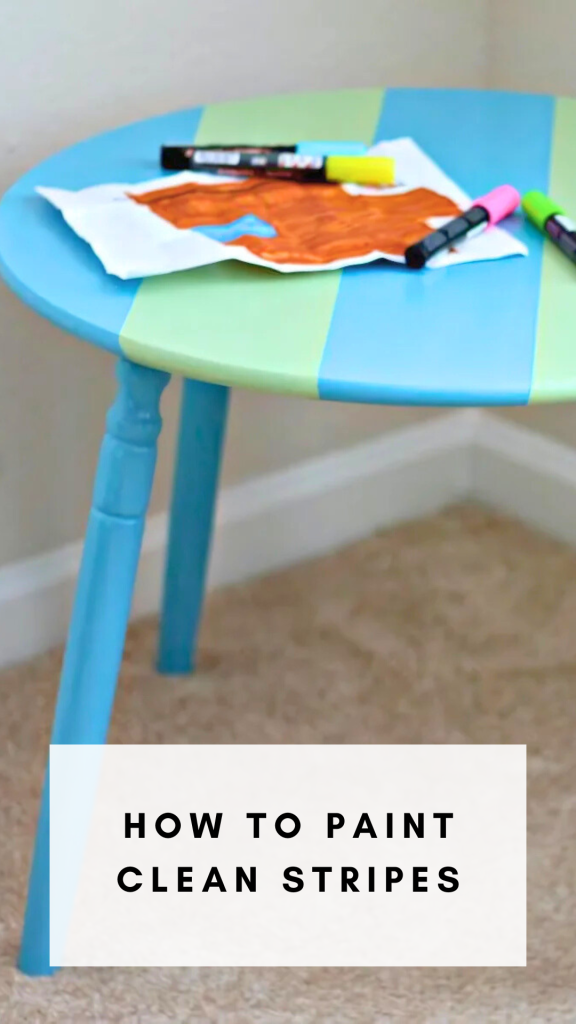
Getting Creative with Stripes
Lately, I’ve been challenging myself to get a little more creative with my furniture painting—beyond solid colors and basic finishes. So for this project, I decided to try something new: stripes!
Not only would stripes give the table a fun, playful vibe perfect for a kid’s room, but I also had a stripe hack I’d been dying to test out. Spoiler: it totally worked.
How to Paint Crisp Stripes on Furniture (With No Bleed-Through!)
If you’ve ever taped off stripes on a project and ended up with messy edges and paint bleeding underneath the tape… I feel your pain. But this little trick fixes that problem completely.
Here’s what you do:
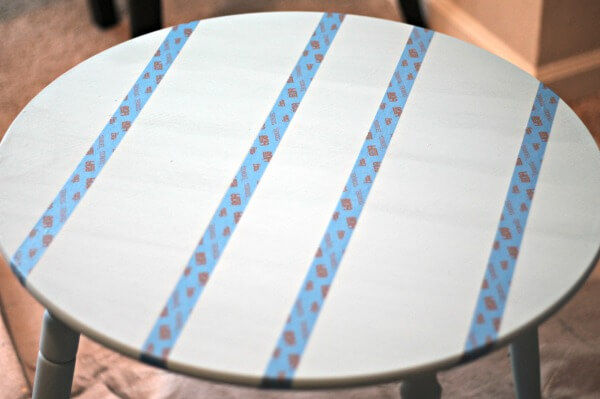
- Paint your base color and let it dry fully.
- Apply painter’s tape over the surface. Tape the outer edges of where you want your second color to go – your stripes. It’s okay if hte spaces between the tape aren’t equal.
- Now for the magic step:
Paint along the edges of the tape with your base color one more time. Yes I know it feels like an extra step – but trust me, it’s worth it.
Why? Because if any paint bleeds through the tape, it’ll be the same color as what’s underneath. So once that layer dries and you add your stripe color, the edges will be perfectly crisp. No bleed-through. No frustration.
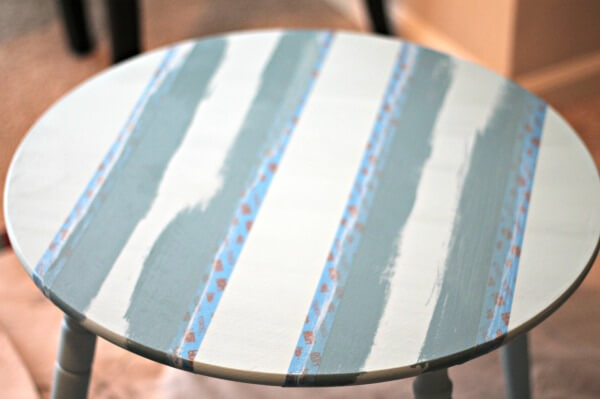
Once the second coat of your base color is dry, go in with your stripe color. Paint with confidence—you’ve got clean lines on lock.
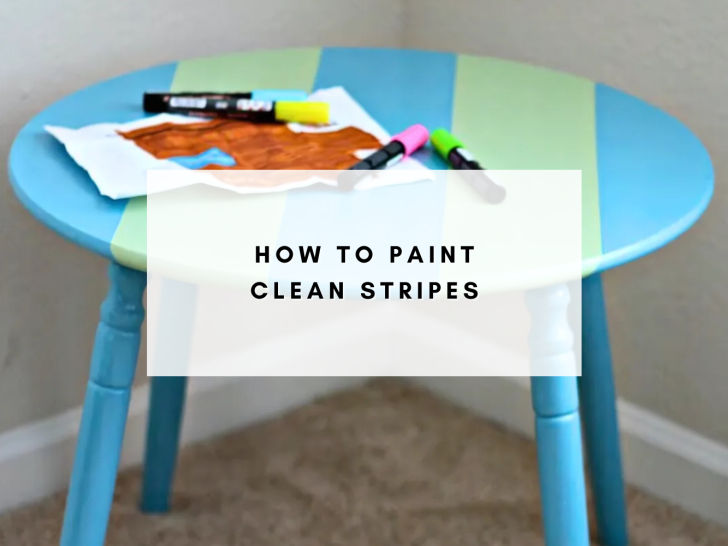
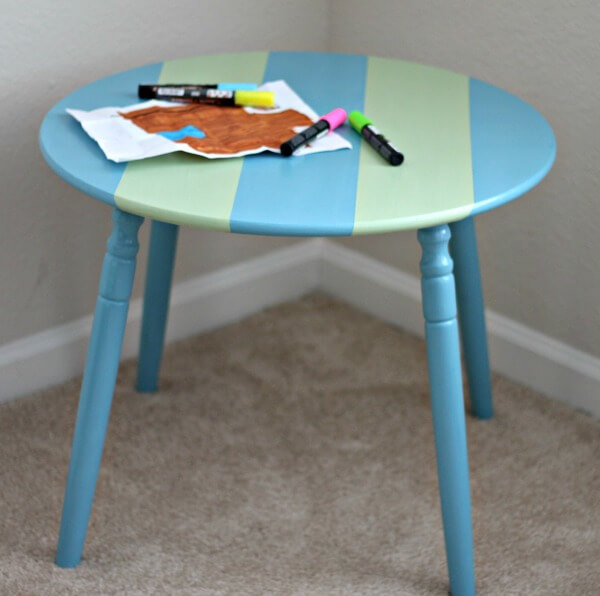
The Finished Look: Bright, Happy, and Ready for Play
I’ll admit it—I underestimated this table. I didn’t expect to love the final result so much, but now it’s one of my favorite quick makeovers. The stripes gave it personality, the fresh colors made it feel cheerful, and best of all… no more dirty Peter Rabbit.
I’m glad I finally gave this little piece the love it deserved. It’s a reminder that even the least exciting projects can surprise you.
Want to Learn More Furniture Painting Tips?
Whether you’re flipping a thrifted find or giving an old piece a new life, painting doesn’t have to be overwhelming. I’ve put together a free furniture painting guide with everything you need to get started—tools, techniques, and tips that actually work (including a few more like this stripe hack!).
Pin this project for your next kids’ room DIY idea, and follow along on Instagram for more fun furniture flips and painting inspiration!

The Makers Link Party - Upcycled Treasures
Sunday 28th of February 2016
[…] may seem easy but it can be tricky to keep clean lines with colors bleeding through. Kala from My Breezy Room shares a great tip on how to paint clean stripes every […]
The Makers {link party no. 4}
Thursday 19th of June 2014
[…] may seem easy but it can be tricky to keep clean lines with colors bleeding through. Kala from My Breezy Room shares a great tip on how to paint clean stripes every […]
Katie @ Upcycled Treasures
Friday 7th of February 2014
What an adorable little stool and the stripes look perfect! Isn't it funny how something that seems so simple {like stripes} can be so intimidating? I have wanted to paint stripes but am afraid they won't be straight, or that the paint will bleed but the tip about painting the base coat first is awesome! I will definitely be trying this out. Thanks for linking up to The Makers! -Katie @ Upcycled Treasures
Kala
Friday 7th of February 2014
Thank you! I can't imagine striping anything much more complicated, like a wall. Luckily my 18 inch ruler stretched all the way across this one, so that gave me a little more confidence that they'd be straight! :)
karli
Wednesday 5th of February 2014
best. tutorial. ever! thank you! i saw you on erin's blog as a sponsor. i am too! showing some sponsor love! new reader!
Kala
Wednesday 5th of February 2014
Thank you! I'll have to check out your blog tonight! :)
jennifer prod
Tuesday 4th of February 2014
such gorgeous design- you should sell these :)
Kala
Wednesday 5th of February 2014
Thanks, lady! I do sell furniture locally here in KC one weekend a month. :) Eventually I'd love to own my own shop, but that's a distant dream for now.